One exam. A complete map of how you move.
BIQ FootID is a structured exam that records how you stand, move and load your feet - each side measured on its own - so your clinician can design care around you, not an average.

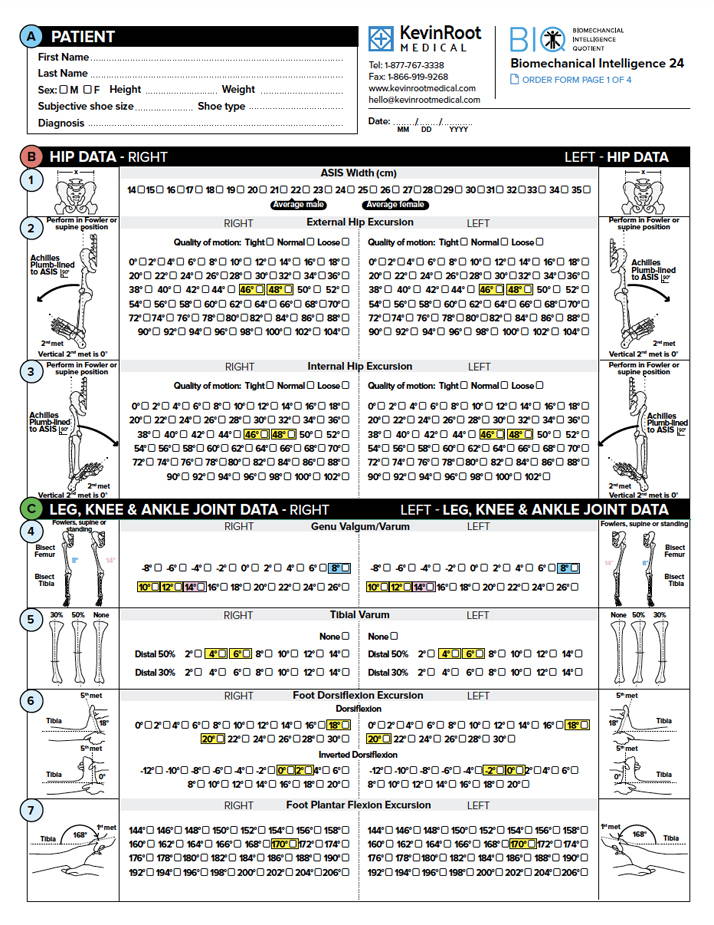
More than a scan.
A scan can show shape. BIQ FootID adds hands-on joint measurements, standing alignment, motion tests, gait observations and pressure clues from the skin. The result is a clear, personal picture of your mechanics. Your clinician uses that picture, together with your symptoms, health history, activities and footwear, to guide your care and any custom orthotic prescription.
BIQ stands for Biomechanical Intelligence Quotient - a structured exam framework from KevinRoot Medical, built on the Root biomechanical method used in orthotic prescription since 1959.
What we measure, from hips to toes
Every measurement is taken on each side separately. Some are seated or lying down; others standing or moving. Here is the map.

01
Hip motion and walking direction
how far each hip turns in and out, and which way each foot points when you stand and walk.
02
Knee and lower-leg alignment
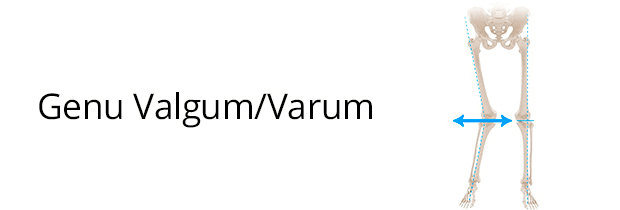
bow-legged or knock-kneed alignment, knee extension, and the angle of each shin bone.

03
Ankle flexibility and calf influence
how far each ankle bends upward, with the knee straight and bent, to see whether calf tightness is limiting motion.

04
Rearfoot and subtalar joint
how the joint below the ankle moves, and how your heel sits in neutral versus your natural relaxed stance.

05
Midfoot, arch and first ray
your arch height seated and standing, how much it changes under load, and how the inside of the foot moves.
06
Forefoot-to-rearfoot relationship
the position of the ball of the foot relative to the heel, and how well the forefoot adapts toward the floor.
07
Big-toe joint function
how far the big toe bends upward, with and without body weight. It matters every time you push off.

08
Foot size and 3D shape
length, width and instep, seated and standing, plus your toe-length pattern and the differences between your two feet.

09
Skin and pressure clues
callus patterns and sensitive areas that show where your feet carry load day to day.
10
Standing and gait observations
how your feet, legs and arches line up and adapt while you stand naturally and take a short walk.
Not every finding is a problem. The value comes from seeing how the findings relate to one another, to your symptoms and to the activities that matter to you.
Your visit, step by step

01
Conversation first.
Your clinician reviews your symptoms, history, activities and footwear.

02
Hands-on measurements.
Seated or lying down: hips, knees, ankles and foot joints, each side on its own.

03
Standing and walking.
Alignment and motion under your own body weight.

04
Scan or photos.
When available, a quick 3D scan or calibrated photos record each foot’s exact shape.
05
The full picture.
Your clinician walks you through what the measurements mean for you.
Wear or bring the shoes you use most, any current orthotics, and clothing that allows access to your knees and lower legs.
Every measurement, by name.
A structured reference for the checks recorded in a BIQ FootID exam.
STANDING AND POSTURE
Initial standing assessment - how you stand naturally, hips to toes, before anything is moved
Includes: knee position front view, knee rotation, knee bend, shin alignment, heel-to-Achilles angle, basic foot structure, angle of gait, heel position
Typical range: no single number - this is the doctor’s visual baseline for everything that follows
Foot Posture Index - a six-part score of your resting foot posture
Includes: six posture checks around the heel, ankle, arch and forefoot, each scored -2 to +2, plus a squat test
Typical range: total score +1 to +7; the average adult scores about +4
Resting heel position (RCSP) - the angle your heel rests at when you stand relaxed
Includes: heel angle against the shin line, measured standing relaxed on both feet
Typical range: within about 2 degrees of straight up; most people rest a few degrees outward
Neutral heel position (NCSP) - the angle when your heel is guided to neutral
Includes: heel angle after the doctor gently guides the joint below the ankle to its middle position
Typical range: about 0 degrees - heel vertical, within about 2 degrees either way
Neutral tibial position - the resting angle of your shin bone
Includes: shin-bone bow measured against vertical, sitting or standing
Typical range: 4 to 6 degrees of gentle inward angle
HANDS-ON JOINT MOTION
Ankle bend (AJDF) - how far each ankle flexes upward, knee straight and bent
Includes: knee straight, knee bent, and a standing lunge test
Typical range: about 20 degrees upward on the BIQ method; the downward-pointing angle reads about 168-170 degrees
Subtalar joint motion (STJ ROM) - how the joint below your ankle rolls in and out
Includes: quality of the movement, roll-in range, roll-out range
Typical range: about 20-35 degrees inward, 10-25 degrees outward
Subtalar joint axis (Kirby test) - the direction that joint pivots
Includes: location and tilt of the pivot line, felt by thumb pressure
Typical range: recorded as a direction, not a number - no published normal
First ray motion - how freely the bone behind your big toe moves up and down
Includes: upward glide, downward glide
Typical range: motion splits about half up, half down
Big-toe joint motion (First MPJ ROM) - how far the big-toe joint itself bends
Includes: bend upward, bend downward
Typical range: 60-90 degrees upward (adult reference); no published normal for the downward bend
Functional hallux limitus - whether that bend stays available while you stand on it
Includes: the same big-toe bend re-checked under body weight
Typical range: pass or fail - the bend should still be there when you stand on it
Hip and knee planes - how your hips and knees line up and rotate in each direction
Includes: hip inward rotation, hip outward rotation, knee rotation, knee bend, knee front-view angle (Q angle)
Typical range: about 45 degrees each way at the hip; Q angle about 8-12 degrees for men, 12-17 degrees for women
ALIGNMENT AND RELATIONSHIPS
Heel-to-shin angle (TC angle) - how the heel lines up under the shin
Includes: the line of the Achilles tendon against the line of the shin
Typical range: no published normal - needs Kevin’s call
Forefoot alignment (met head alignment) - where the ball of your foot sits relative to the heel
Includes: the angle of the ball of the foot while the heel is held in line
Typical range: 2-4 degrees of slight inward tilt; angles of 20 degrees or more are highly significant
Total varus (Schuster test) - the combined inward tilt from leg to foot
Includes: shin, heel and forefoot angles added into one total
Typical range: no published normal - needs Kevin’s call
Navicular drift and drop - how much your arch bone slides and lowers under load
Includes: drift (how far the arch bone slides forward) and drop (how much it lowers from seated to standing)
Typical range: drop of 5-9 mm is the usual adult band; near 4 mm or less suggests a stiffer foot, near 10 mm or more a very flexible one. Drift has no published normal - needs Kevin’s call
Predominant plane of deformity - the main direction your feet compensate
Includes: which of the three body planes carries most of the compensation
Typical range: a direction, not a number - no published normal
STRENGTH AND FUNCTION
Single heel raise - whether you can rise onto one forefoot, and how
Includes: straight-knee raise, bent-knee raise, each side
Typical range: pass or fail - you should rise smoothly with the heel turning inward, both ways
Strength testing - key muscle groups, each side on its own
Includes: the muscles that pull the foot up, down and out (front shin, back calf, outer calf), graded strong, good or weak
Typical range: strong and even side to side
Supination resistance - how much force it takes to roll your foot outward
Includes: graded force against the arch, each foot
Typical range: no published normal - needs Kevin’s call
Windlass test (Hubscher’s maneuver) - whether your arch tightens correctly when the big toe is raised
Includes: arch response as the big toe is lifted, seated and standing
Typical range: the arch should tighten and rise promptly, without pain
Leg-length landmarks - whether one side sits higher at the hip or leg
Includes: hip and leg landmark heights compared side to side, marked which side sits higher
Typical range: level side to side - equal lengths
SIZE, SHAPE AND SKIN
Foot size and 3D shape - length, width, instep and toe pattern, seated and standing, both feet
Includes, for each foot: five core measurements taken twice, once seated and once standing - heel-to-longest-toe length, heel-to-ball (arch) length, width at the ball, arch height, instep height; plus the toe-length pattern (big toe longest, square, or second toe longest), the relative lengths of the long bones behind the toes, the five-level standing foot type (high arch to flat), the Achilles-tendon bow seen from behind, and a check of measured size against the shoe size you usually wear. The full app protocol repeats the same five measurements in guided arched and guided rolled-out positions as well - 20 readings per foot in all.
Typical range: there is no universal normal for foot size and shape - every foot is its own baseline, and the two feet often differ. Standing foot type uses the same +1 to +7 posture band as item 2.
Skin and pressure clues - callus patterns and tender spots that record where you carry load
Includes: callus map under the heel and ball of each foot, tender or prominent spots
Typical range: no numeric normal - the pattern itself is the finding
One visit, mapped.
Jordan is a composite example created to show what a BIQ FootID visit can look like. It is not a real patient, and it is not a promise of any specific result.
Jordan is 42, runs three mornings a week, and has been nursing a stubborn heel ache that is worst with the first steps of the day. Stretching helped for a week, then didn’t. A friend said, “Get your feet measured - really measured.”
The visit starts with a conversation, not a machine. Jordan’s clinician asks about the heel pain, the running, the old ankle sprain in college, and the shoes in the rotation. Then the measuring begins.
Seated, the clinician rotates each of Jordan’s hips in and out. The left hip turns inward noticeably less than the right. Each knee is checked for alignment, each shin for its angle. With Jordan’s knee straight, the right ankle barely bends upward; with the knee bent, it moves further - a sign the calf muscle is part of the limit. That difference gets its own line in the record.
Standing, the clinician looks at Jordan’s heels from behind: in a held “neutral” position they sit close to vertical; relaxed, both heels rest outward, the right more than the left. Arches that look perfectly normal seated drop measurably under body weight, and Jordan’s right foot lengthens more than the left when it loads. Under the second metatarsal of the right foot there is a patch of callus Jordan never thought about - a quiet record of where pressure has been concentrating.
Then a short walk down the hallway. The right foot points slightly outward, and the arch on that side rolls in through mid-stance. Finally, a quick scan captures the exact three-dimensional shape of each foot.
No single finding explains the heel pain. Together they draw a map: a calf that limits ankle motion, a foot that compensates by rolling in, pressure that concentrates where the callus grew. Jordan’s clinician talks through options - a calf-loading program, a look at the running shoes, and a custom orthosis designed from Jordan’s own measurements to manage load while the tissue settles. Whatever Jordan chooses, there is now a baseline on record, so the next visit measures change instead of guessing at it.
“No single number told the story. The map did.”

From map to made-for-you.
01
Scan
your BIQ FootID record and foot shape are captured.
02
Prescribe
your clinician designs your device digitally, choosing from 845+ modification options.
03
Fabricate
KevinRoot Medical manufactures your device, custom-molded from your scan.
04
Treat
you get an orthosis built to manage load and motion for your feet, your shoes and your activities.
Custom orthoses manage load and motion. In an adult, they do not reshape bone or “fix” structure - and no honest provider will promise they do.
Built on 65 years of biomechanics.
Dr. Merton Root pioneered the functional orthotic approach that changed foot medicine. KevinRoot Medical carries that framework forward with 3D volumetric scanning and precision manufacturing - trusted by leading podiatrists, physical therapists, orthopaedic surgeons and professional athletes worldwide.
Founded 1959
845+ modification options
Millions of patients treated
24h rapid turnaround
Every patient deserves to be treated like an athlete.

Dr. Howard F. Liebeskind
When you truly care, subpar results are not acceptable.
Dr. Richard Blake
Helping athletes perform at their highest level.

Alexis E. Dixon, MD, FAAOS
Questions, answered.
Does the exam hurt?
How long does it take?
How should I prepare?
Is BIQ FootID a diagnosis?
Will I automatically get orthotics?
Is the exam the same for everyone?
Ready to see how you move?
Ask your clinician about a BIQ FootID exam, or find a provider who offers it.
KevinRoot Medical - BIQ FootID supports professional judgment. It is not a stand-alone diagnosis, a promise of a specific outcome, or a substitute for medical care.
What knowing your geometry gives you
Your feet are not one number or one “type.” BIQ FootID records the size, shape, alignment and motion of each foot separately, then uses that full picture to guide footwear, orthotic design and monitored load management. The goal is not to correct your structure. It is to understand how your geometry behaves so your doctor can make a more specific, reversible plan.
TOE-LENGTH PATTERN
What it shows: Whether the big toe is longest, the first two toes are similar, or the second toe is longest. These are common shape variations, not ancestry labels or deformities.
Why it matters: It guides toe-box shape and clearance, placing the extra room at the toe that actually needs it. By itself, toe pattern does not select an orthotic design.
METATARSAL LENGTH RELATIONSHIPS
What it shows: How far the metatarsal bones behind the toes project relative to one another. This is different from simply having a longer second toe.
Why it matters: When symptoms, callus location or pressure data support the same finding, it can help your doctor investigate a local overload pattern and consider a monitored footwear or accommodation trial. It never proves the cause by itself.
FOREFOOT-TO-REARFOOT ALIGNMENT
What it shows: How the ball of the foot sits relative to the heel, including inward or outward tilt and how flexible that relationship is.
Why it matters: It helps distinguish structure from available motion, giving the doctor a better basis for side-specific posting, padding or accommodation decisions.
BIG-TOE JOINT AND FIRST-RAY MOTION
What it shows: How the big-toe joint bends and how the bone behind it moves, both off the ground and under load.
Why it matters: It helps your doctor assess how the foot prepares for push-off and whether shoe flex, rocker design or a reversible orthotic feature deserves a monitored trial.
ANKLE MOTION
What it shows: How far the ankle bends with the knee straight, with the knee bent and during a standing lunge.
Why it matters: Comparing those positions helps show where motion is limited and gives context for heel-to-toe drop, heel-lift and load-management choices.
PRESSURE CLUES AND PROMINENCES
What it shows: Callus, focal tenderness and bony prominences mapped to an exact location on each foot.
Why it matters: These clues help your doctor identify where repeated local stress may be occurring and plan relief or accommodation. A callus alone does not prove pressure magnitude or its cause.
RIGHT-LEFT DIFFERENCES
What it shows: The differences in size, shape, alignment, motion and load response between your two feet.
Why it matters: BIQ FootID keeps each side independent, so footwear checks and orthotic choices can reflect the foot you actually have on each side instead of forcing a matched pair.
ARCH HEIGHT AND WEIGHTBEARING FOOT TYPE
What it shows: Whether your loaded foot presents as higher-arched, balanced or flatter, and how the arch changes from sitting to standing.
Why it matters: It gives your doctor context for how the foot accepts load and helps guide arch-profile, shoe-volume and monitored comfort decisions without treating an arch label as a diagnosis.
HEEL POSITION AND REARFOOT ALIGNMENT
What it shows: Where each heel rests in relaxed standing, where it sits in neutral, and how it lines up beneath the shin.
Why it matters: The relationship between those positions helps your doctor understand available rearfoot motion and choose a side-specific way to manage motion and load.
LEG AND KNEE ALIGNMENT
What it shows: Bowleg or knock-knee alignment, tibial angle, knee position and the relationship of the leg to the foot.
Why it matters: It adds the mechanics above the foot to the plan, so the orthosis is not designed from foot shape alone and does not claim to straighten mature bone.
FOOT LENGTH
What it shows: Heel-to-longest-toe length, measured separately for right and left and in both seated and standing states.
Why it matters: It supports more accurate footwear-length and toe-clearance checks, reveals load-related elongation and avoids assuming both feet need the same size.
HEEL-TO-BALL LENGTH
What it shows: The distance from the heel to the first big-toe joint, which can differ even when two feet have the same overall length.
Why it matters: It helps compare the foot’s natural bend point with the shoe’s flex point and rocker position, while preserving the larger of heel-to-toe and heel-to-ball as the fitting guide.
FOREFOOT WIDTH
What it shows: The width across the ball of each foot and how much it spreads under body weight.
Why it matters: It helps screen shoe width, toe-box space and orthotic cover or frame dimensions, reducing avoidable crowding from a width chosen by length alone.
INSTEP HEIGHT AND FOOT VOLUME
What it shows: The height over the middle of the foot and how that dimension changes between unloaded and standing positions.
Why it matters: It helps your doctor check shoe volume and orthotic space before adding material that could crowd the foot or change comfort.
Better geometry does not mean more correction. It means fewer assumptions, a more precise starting point and a plan your doctor can watch, test and adjust over time.